
Who wanted to see what happened to the gingham enhanced boxy jacket? Remember where we left off? My client was pinned with strips of gingham horizontally and vertically but what happens next? Do I get out the magic wand and all that is super translated into a real working pattern? Not really.
In my world, which may be different for you, I work backwards for this step. I take apart the muslin and lay each piece under the paper pattern to see where they differ and choose the next step. Time consuming, you bet, but never a waste of time. This trains your eye and brain to think in the flat as opposed to 3-D. Is this a good thing? Of course it is…all paper patterns are flat so get used to it.
Let’s start with something simple, the lower fronts and backs. Not much was done except once the gingham was added to the upper sections it allowed the lower sections to drop about 2 inches and swing towards the side seams which we will trim off. I originally cut a size 18 except for adding at the hip level for more ease.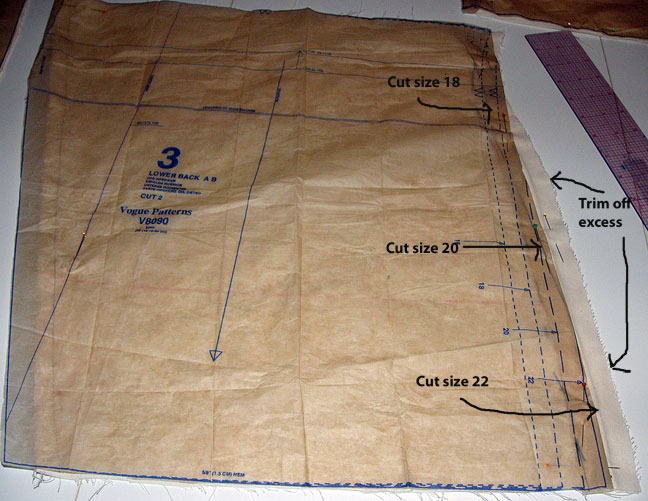

How about the fronts? 
 Please click on the photos to see better. While the huge wedge throws off the grainline, we just make a new one and slide the shoulder up to cover the extra added gingham and that opens the rest of the wedge where the gingham is missing under her arm. She needed more ease to raise her arms so this is where it goes. The front neckline edge will be trued up later. Since we have added 1/2 inch to both the front and back shoulder area, the sleeve is next and it shows that we have also managed to add exactly 1 inch to it with gingham…love that!
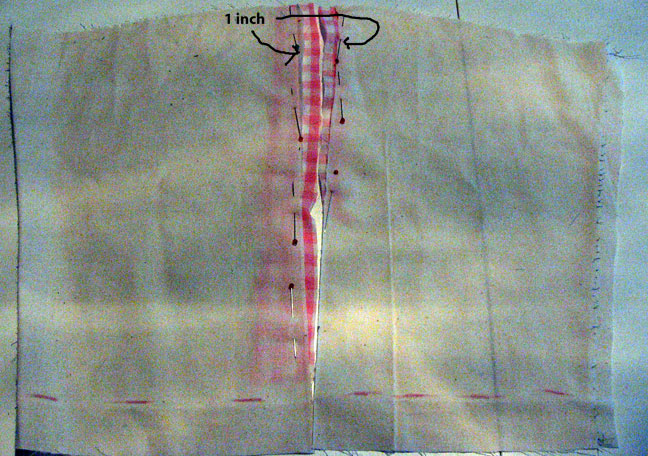
Now we have ease, more depth in front…what’s left??? My favorite adjustment, one I have been doing on my own patterns since I was in my 30’s. Let’s add some curve to the upper back and make the neck edge hug the neck and not fan out…who wants that? Slide the shoulder up like with the front and open the slash deeper. 
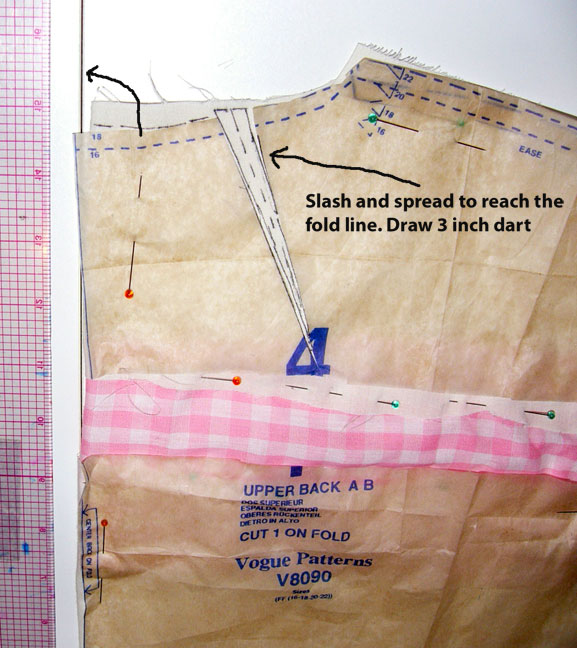
My folded edge just crossed over the line a little, forgive me, I get so excited making this new dart!!! But seriously, this make such a difference! If you don’t have to allow for that center back fold, just let the center back seam allowance curve a little and enjoy the perfect new fit. I will use the paper pattern with the muslin attached for cutting out the new fabric or I could add new paper patches and tape them on permanently…depends on how I feel…will I make this again…that is up to the client. I am forever encouraging her to color block- light on top sections and darker on the bottom, throw in some cool piping etc…keep your seamstress happy!

Gee Mrs Mole, if you taught patternmaking I’d be out of business because everything would fit perfectly!
I’m learning so much from your blog (and I thought I knew a lot before), so thank you for your detailed descriptions of how you make patterns fit. Do you find, as I do, that today’s patterns are inferior in design and fit to the ones from the 60’s and 70’s? I suspect that a lot of today’s patternmakers don’t really understand the basic concepts and hence design unwearable garments.
One of the problems I encounter a lot with clients is a bulge in the back seam of jackets (creating a hunchback effect!). It’s very easily rectified and makes a huge difference to the fit of the jacket, and I assume it is caused by the distance from neck to waist being too long and therefore causing the problem when the jacket’s back is longer than the client’s back. Not having dabbled in patternmaking for quite a while, am I right? Of course it could be that I have a lot of short-backed clients!
Are you going to show us the finished product when you’ve made the jacket? I’d love to see it.
Yes, Trish pattern from the 60’s and 70’s fit better, had better instructions and better results…the further back we go the better they get. When I was in design college we were told if our pattern making skills were not good enough to work in a design house we could always get a job with a pattern company so that says it all. The upper back length is longer as you said, the spine curves out at the point as we age and we have to address it by adding at least a 1/2 -1 inch to all patterns. This may reveal a swayback adjustment as we do this by adding more fabric to the lower area but if you truly need it, it will just make the horizontal drawn lines on the muslin stay parallel with the floor. If they droop, then he swayback correction is used as well…then there really cannot be a center back fold on the pattern. You have to add a center back seam but the cool thing is, even if this seam looks a bit like a snake curving out at the top and in at the bottom, you can still put in a zipper and it will work well!!!
I have short waisted clients with upper back curves but a muslin will show up all the changes with lines drawn and then pinning out what you don’t want or need. I love this phase!!!
I will certainly show the finished jacket!!!
Hello Mrs Mole – you make it look so easy! I almost never adjust patterns and probably should all the time, but I’m a bit too scared. One thing that has me confused (if you wouldn’t mind explaining?) is where you say: “While the huge wedge throws off the grainline, we just make a new one” – which section of the cut-in-pieces grainline do you follow?
Thanks!
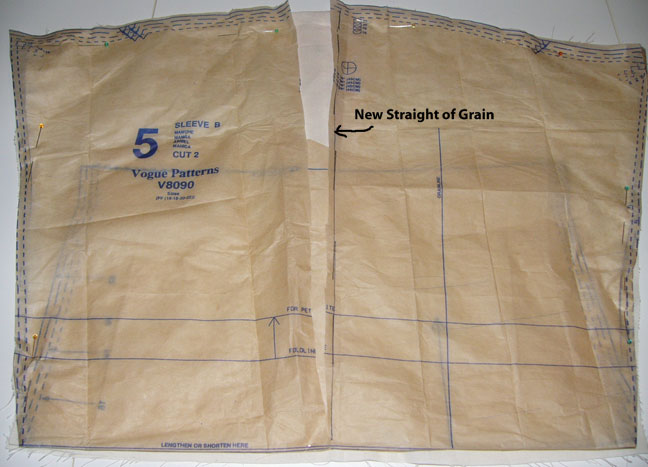
For the front section I always use the original center front straight of grain like where the buttons would go as the top part of the neckline is throw off at quite an angle. A trueing up line would be drawn across the raggedy gingham wedge edge to make it smooth before cutting out the real fabric. On the back the fold line is straight throughout. The sleeve is simply folded in half and the new line drawn down the middle.
Hi what a fantastic detailed post which we can all benefit from – you are very generous with your time explaining all these steps because as a fellow blogger I know how long it takes to take each photo and then write it all up – great, very useful post. Thanks
Thank you for dropping by Pauline. I learn tricks from so many blogs, things you won’t find in books, well not just one book and as these situations arise we sewers have to be very creative to solve problems especially fit. Bunny just did a very cool creative tutorial on her site on a zipper tail…check it out: http://lasewist.blogspot.com/ Like I said, this is the way my brain thinks, it may not work for everyone but I try to make it simple with gingham…plus the gingham can be pinned very straight following the 1/4 inch squares and calculated quickly without a ruler.
great photos of the pattern changes! I have never seen that back adjustment. If you are adding the extra ease to the side of the sleeve, why do you add it to the center of the sleeve rather than at the same point on the side? sewingforme.wordpress.com
I just follow the gingham path, if I added in the center for the client’s ease, I add for the same place in the paper pattern. I could have added at the underarm area on this one 1/2 inch on each side and tapered toward the hem but if she had needed more height in the sleeve cap, this would have shown up and been added at the final step. Let’s say she needed 2-3 inches instead, then adding under the arms would not give us the same effect. I would rather make one center cut than add 2 strips of paper down each side…call me lazy. Thanks for asking!!!!
You know how in Peanuts cartoons when the grown-ups speak they make sounds like whawhawhawha. That is roughly how much I understood most of this post the first 6 times I read it. 8-D
Seriously, thank you for sharing your considerable wisdom with all of us. ♥
All I am doing is letting the gingham tell me where to add. Then the paper pattern follows the same dimensions. As for the upper back correction, I will continue to do it in these posts and maybe it will make more sense if you need it for your own patterns.
This is definitely not my favorite part of fitting, but it’s gotta be done, ugh! But, you are a true genius at it…so much patience!!
And, you know this stuff that you are sharing FREELY, would cost $$$$ for someone to get their hands on. So, a BIG thanks for sharing your knowledge!!
You are very welcome and if anyone out there has my client’s shape they can follow along as we do more of these.
I do hope your client appreciates all of your efforts (and knowledge!).
I am looking forward to seeing the completed garment.
Great post.:)
She does and we have become good friends over the years. She is being educated in fabric selections to get the results she wants and I have been educated in her needs for more comfortable waistband treatments like adding elastic on some pants and ditching the facing after she lost 20 pounds. Substituting elastic for a facing keeps the pants flat against her without bunching or making them look like grandma’s elastic waist pants. Thanks for your comments, Kim!
Great post! I love to watch you demystify- while I eat popcorn with a dog on my lap.
Too bad we don’t live closer so i could work on your patterns in person and meet the dogs and eat popcorn! What a fun job that would be…leave the brides behind and travel and do what I like best…not yet…
This is so interesting and educational and helpful and WOW! Thanks so much for posting all these details. But I have question. Do you do this sort of gingham-fitting on garments for yourself? And if you do, how do you manage it? I don’t really sew a lot for other people, but fitting myself is very difficult. I’d love to hear your thoughts!
I have a duct tape mannequin that is my model. She was created years ago when I was bigger but I figure if bad fitting shows up on her, it will still look bad on me. I did a post or two on the Liberty shirt which doesn’t look good on either of us. You have to be patient to cut across your own muslins and pin pin pin the gingham in there but it can be done. But after a while you will know where to add at the paper stage and not have so much to deal with. Also you may get a pattern that you can use as a basic block that can be overlayed over every new one. Wouldn’t it be nice to have one cut out of thick plastic like they use under tablecloths that you could see through? Drawing lines vertically and horizontally on your blank muslin before it is basted really helps let you see where the lines swerve and where extra fabric should be added or subtracted…turn yourself in a grid and see what sticks out!
Excellent post! I’m marking this as a fave, and may even print it out to study it. Not only is it filled with great little tips, but also inspiration on how to figure out my own fitting issues – thank you!
Thank you, Jilly! I never wish these drastic alterations on anyone but seeing as patterns seem to running in this direction…flat front and flat backs and riding up in front and back with center fronts swing away from the body instead of toward…something has to be done if one wants to wear something that fits and flatters…what a concept Love your latest creations!!! fabrics to die for and great construction and secret pockets..yummy! When you add a funky hat and shoes it just makes me gasp…”is she a model?”
Mrs. Mole, I am thrilled to have found your blog. I stumbled onto it while playing around on Google for my business. I have chuckled through the whole blog the last few days. I am currently a (clothing) retailer until I retire shortly, but I have been a sewer since I was 11 partly because retail never fit, and have always loved fashion. I have done sewing and alterations (not bridal) in a past life, although never with your talent and expertise. (My worst customer wanted me to replace the elastic on her ancient, superior quality European “knickers”). I didn’t know what to say, so I just said it was cost prohibitive. I love your lessons and humor and totally relate to all the customer experiences. Thanks
Hi Mary Anne, when clients ask me to do stupid things I say the same to them, “It’s just not worth my labor” so they decide to buy a new pair. Retail is a whole other bag of trouble…I worked in a quilt store once for 4 years and could not get over the women who were so needy and just hung out there because they were so lonely and used the hired help as counselors…
This post has been so informative. You really provide a great service to us bloggers out here.
A “zipper tail”, I like that. Thanks for naming the process and all the props. As always greatly appreciated.
Pingback: Tunic and a tea cup | fit for a queen