
The phone call went like this, “I have my mother’s wedding dress and I’m getting married in May and I have had a little trouble getting the zipper up”. I assured her that most dresses can be saved with a corset back and we made the appointment. Now, this bride lives almost 2 hours away and was willing to travel for a consultation.
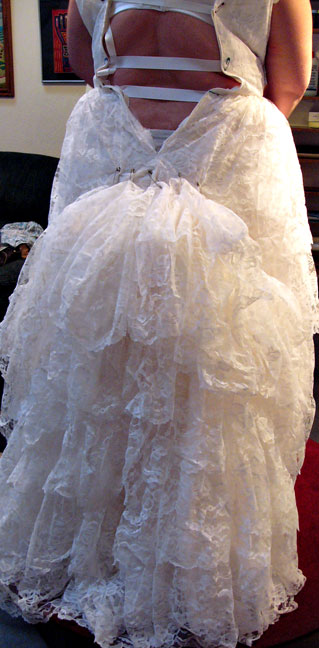
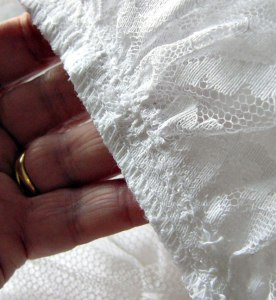
Here is what we had to deal with:


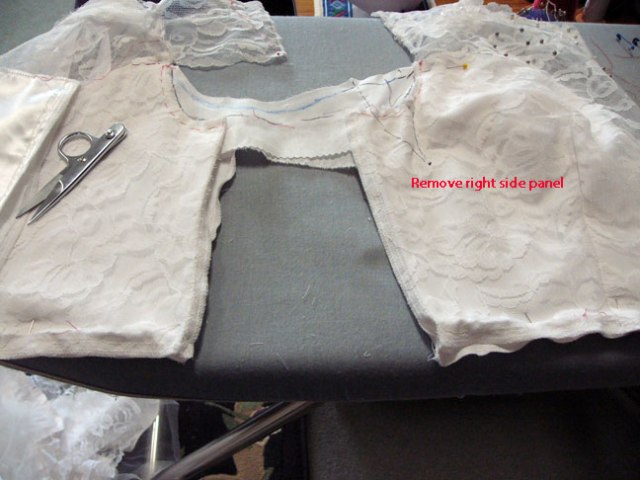
OK, gasping time is over…let’s get real, people… First thing was to cut the sleeves off to see if we could get the shoulders up on her as she didn’t want them anyway. Then realizing that the zipper was never going to zip up, I ran ribbons across to keep the back together. With a gap of over 12 inches/30.4 cm even a corset back would not be enough.

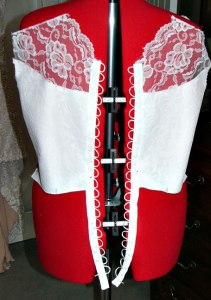
Taking a look at the side seams, I decided that I would add two 4-inch wide panels made from the sleeves and also two 4-inch panels at the shoulder to drop the front darts in the bodice low enough to sit properly on her waist. Corset loops would be made for the full length of the zipper opening of 22 inches.
Besides all the upper alterations, the train would need 5 bustle points and I would have to remove the lower lace ruffle layer to use to replace some stained layers in the front of the skirt. Even adding side panels there would be a gap in the underarm section so that will need extra fabric too. Did I forget to mention that the bride does not want me to change any seams so that her daughter could wear this dress in the future? So in other words, everything that I do to get her into this dress must be able to be removed/reversed years down the line…nothing like having restrictions is there? No stress…

Have a look at this train…WOW! I have already removed the lowest layer of lace ruffle to fill in stained spots on the front ruffle and the satin lining will be trimmed and hemmed as well. The bustle will require 5 points just to get all of this fluff off the ground.


Let’s get started…make 22 inches of loops for the corset back and attach to the bodice.


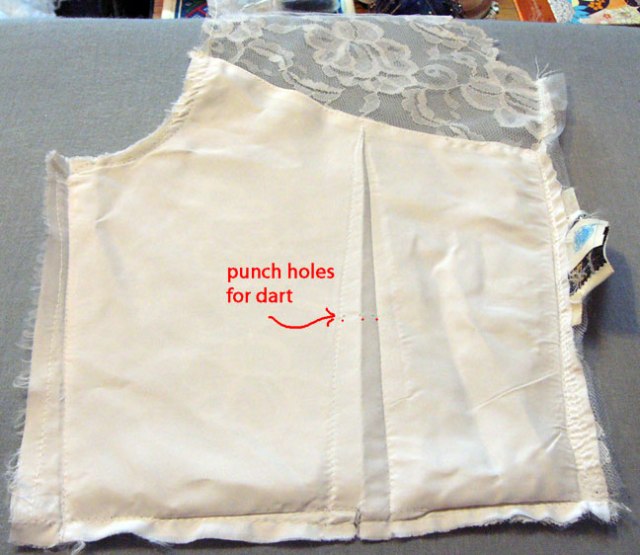
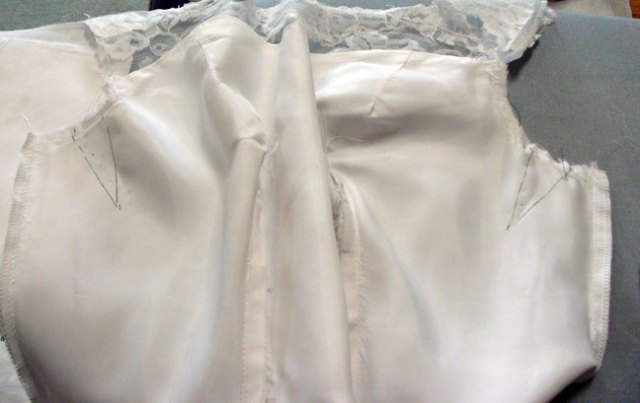
Position the bodice on the waist and measure how wide the shoulder panels will have to be. Let out back darts, we don’t need them, see the punch holes in the satin from the factory?
Positioning the bodice on the enlarged mannequin, gives you an idea of what is needed to fill in the gaps.
With the side panels attached and shoulder panels attached you can see the curved underarm area that has to be filled in later. At this point you may be wondering…what are those little black things on the upper bodice? Well, they are glued-on fake pearls that have turned into little nasty lumps. The groom says he can paint over them with car model paints and make them white again.

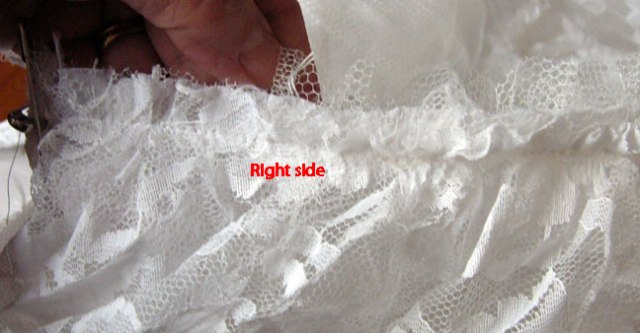
The top edge of the skirt was just a jumble of thin cheap netting and all raw edges…makes you wonder what the procedure for the inside of gowns back then were. I removed the netting and reinforced the top of the skirt with white rayon hem tape. Then everything was clean finished with the serger.
Ever wonder how netted petticoats are made? Ever wonder how each layer of netting is attached equally down the netting base? How about following little marker holes cut/burned at the factory during cutting?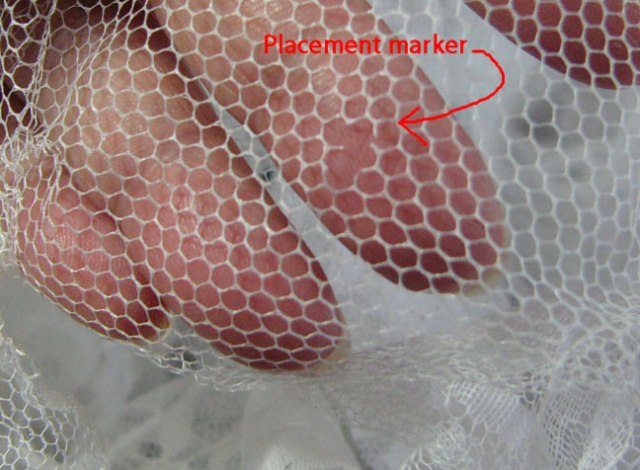
Next, attach the skirt and see how close it fits.

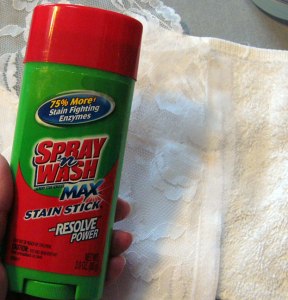
Even though this dress had been cleaned and stored in a box for 44 years…it had wine stains down the front ruffles and also the metal hooks and eyes left rust stains. I managed to get the rust stains out with my stain stick but the stained ruffle had to be replaced with cutting from the back hem ruffle.


Unto the second appointment:
There will be an armscye bust dart added/pinned and you can see the extra section that has to fill in under the arm.

But lo and behold, when I went to lace her up…look what happened!
No need for a corset back now! I will put in an invisible zipper and add grosgrain straps under the lace like she wanted to cover her bra straps. Adding 8 inches to the circumference has made such a difference and with the addition of 4 strips of boning in the side panels, new wide grosgrain ribbon straps under the lace, we may just have a winner on our hands!

So, let’s remove the skirt again and make all the side panels and underarm curved section.

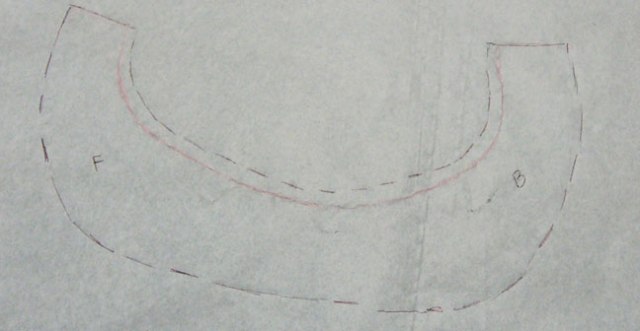
Both panels are removed and darts drawn in, fronts and backs stacked.

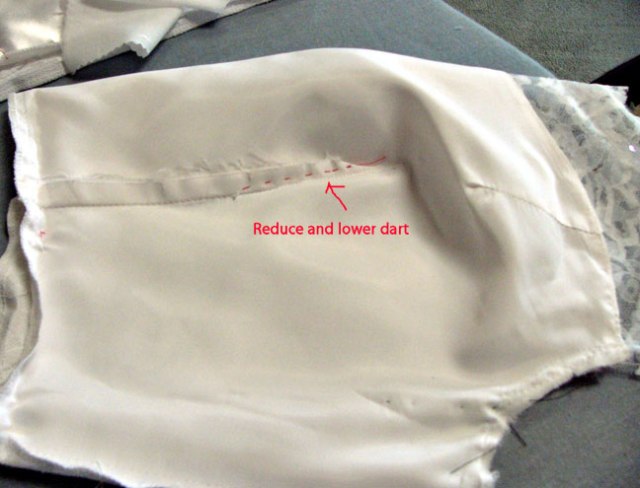
Now for the fun part…the underarm section has a dart too…or does it? Let’s stack them and see if we can remove it.

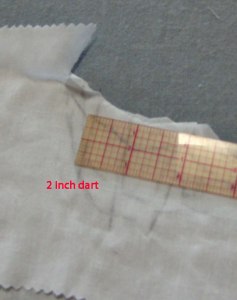
It is a 2 inch wide dart
But not anymore…

Let’s make a paper pattern…make it with lace lined with the satin from the train.
 Make the bust darts first…then attach the weird curved sections.
Add the curved panel which will have an edge binding later to join up with the straps. All seam allowances will be trimmed.

Hand baste in a new heavy duty invisible zipper and the 4 new boning strips.

Grosgrain ribbon straps basted under the lace to cover bra straps and lower lace ruffle removed and satin layer hemmed…all we need now is a body and everything can be finished…fingers crossed! Oh…we might add a belt…you never know! Final photos will be coming later!!! Thanks for sticking with me on this one!

Our 4 days away for my birthday were just magical and next time I will share a few photos when I can get Mr Mole to release them from his phone.
Happy Sewing, everyone!

That is unbelievable …both that the bride would want such extensive alterations and that you could make it work! So amazing that you have the patience. Thanks for sharing these stories with us both fun and educational.
I keep wanting to learn the lesson and not say yes to every challenge but they keep showing up and after all they are entertaining for all of you!
You are a true engineer. You could build bridges and skyscrapers. I just stand in awe of you. Your brides are blessed to have you!
It is funny that you say that, Kansas…I wanted to be an architect back in 1968 but girls were not allowed to take drafting and mechanical drawing. But in a way I am doing what I set out to do just with fabric and bodies…ha ha.
That’s not funny, that’s true. Alterations are engineering.
This is jaw droppingly great.
My sister had that exact problem when she wanted to take mechanical drawing when in high school in 1963. What a difference that might have made in her life as she had the talent for it. I got after my parents for not backing her up and forcing the issue but they gave in which was unusual for them.
Mrs. Mole – you never cease to amaze!
Thank you, Auntie V….my mission in life…to share photos and to encourage others to take the step in altering…it’s not so bad…you do get paid!
Wow. (I remember trying on my mum’s wedding dress… I have feeling you could’ve made it fit me… but it’s 26 years too late now…) I’d be curious to see pictures of the mother wearing the dress next to ones of the daughter to see how they compare…
I have to ask her before she makes the final payment, for a photo of her mother in it, don’t I? The other vintage dresses I have cooking here all have the original photos which really give the flavor of the time. Maybe yoiu have a daughter who wants to carry on the tradition?
Wow. That is a LOT of work. And amazing problem solving skills, Mrs Mole. And a lot of dress. Good heavens! Seeing that all put together on the mannequin… the layers of lace… the train…
You forgot one thing, Melodia…THE WEIGHT…of the dress not the girl. When other brides visit and hold that train they just gasp and say they are so glad that they do not have to carry that around on their butt all day!
Oh, goodness…. I’d never thought of that. All I saw was the layers and layers of lace and didn’t think of the underlings. Well, I hope it’s not a hot day for the wedding!
OMG! You are always amazing in that 1) you have the patience to do what you do and 2) YOU HAVE THE TALENT!
Ha ha…Laura, you know I have patience and lots of time on my hands to find solutions just as you do with your award winning quilting. Thank you!
Wow! You basically created a new dress for this lady!! Beautiful, magician skills! I can’t even begin to imagine what a job like that would cost someone! You are a miracle worker! Thanks for sharing your incredible details & photos!
Your creations take my breath away, Diana! http://www.dckcreations.com/gallery-ii
In a way bridal can be like costuming…worn for a special event and needing some “WOW” factor…only most of the time I want to shout “WOW” when we can’t get the zipper up!
You ARE a true Miracle Worker! When you showed that first picture of how much space was open on the back, I was wondering what you would do to make it work. I am in AWE!
Oh Carolyn…it’s all about circumference!!!! Being a fluffy girl myself, I can see where new sections have to be added but it was surely a bonus to not have to use the corset loops. Now…who needs 22 inches of hand made white loops? Anyone?
I was going to use the same “miracle worker” phrase. Truly, you do amazing things, Mrs. Mole!
I just finished the first communion dress for my granddaughter. After learning that she wants to wear it then put it away for her daughter to wear someday, I was careful to leave good seam allowances and hems and to give her mom all the remnants to pack away with the dress. Thanks, Mrs. Mole, for helping me make an heirloom.
That sounds so nice! I wish my mother had saved my first communion dress for my girls but she saved nothing from my childhood. At least I have the group photo from way back then. Do you have a photo to share?
You are truly amazing. And my good, forbearing. I would have told her she needed to get a new dress. Incredible work you do.
Your landscape quilting looks very creative and calming…I do admire other creative projects and all the thinking that goes into them,Julie.
http://thebeautyofastitch.blogspot.ca/
If ever there was a seamtress that deserved to be in sewing hall of fame, it would be you, Mrs Mole!
When I visit other seamstresses and see the volume of work that they do and compare it to my little workshop, I have to toss in the “degree of difficulty” like in professional gymnastics…maybe I get extra points for crazy?
“A little trouble getting the zipper up”–?! You are a miracle worker.
Thanks, Elle…I guess if she said she was having a Hell of a time getting the zipper up, I might not have taken it on. Better to minimize the struggle…ha ha.
I agre with all of the comments. Incredible patience and a miracle worker. Of course, knowing you, you love a challenge.
Mr Mole knows the drill…the phone rings, the sad story unfolds and the next thing you know, I have a real doozey of a project. So many more vintage gowns are surfacing this year, so more fun to come! Thanks, Donna!
Awesome job. I am wondering what will even be left when (and if) her daughter would want to wear it. Those fabrics do deteriorate, especially the linings. Painting those beads sounds crazy. I think I’d soak them off and glue on new ones.
You never know what people have in their head for a dream dress. If this woman’s daughter waits 43 years to wear it…it will be 2060 and I won’t be around to make it work…ha ha.
As everyone else has said, your patience is astounding Mrs Mole! I kept thinking: why wouldn’t she buy a dress, because the finished product won’t look anything like the original.
It must have taken an enormous amount of time, and have been very unwieldy to work with. You’re a saint.😇
It all has to do with sentimentality and probably a little pressure from her mother who wants to see that dress walk down the aisle once more. The bride waiting 43 years to grow into it.
It is a beautiful dress with all that lace, no wonder it is being worn again, and again. You are fabulous at your profession and I am amazed at the changes you made!
You are a genius Mrs Mole. You must love a challenge.
+1. Amazing.
I’m aghast at the level of self delusion you deal with. A little difficulty doing up the zip????? Your work on this is proof of miracles.
You know, Jay, I have to laugh when I get in one of these impossible dresses knowing that it will make a really cool blog post!
Wow….. another reader left semi-speechless. It would be lovely if the bride could / would opt for some sort of corset-type ‘foundation garment’ that would obviate the need to hide bra straps. (Do they still make long-line bras???) I’m not suggesting corset so she could cinch in her waist like some latter-day Scarlett O’Hara but merely a structure that would give a smooth line for the bodice of the dress.
I case she solicits opinions I vote to add a reasonably simple belt.
I tell all my brides that formal clothes require formal underwear but usually these gals live miles from any store and are too large to just buy online so if I can insert boning to help a bit…I do it. I remember long-line bras…they even used to show them on TV…remember? Hopefully the belt will just be grosgrain ribbon to blend in with all that lace.
Amazing. You remain undaunted and unfazed throughout. I bet you’re good at jigsaw puzzles too.
Yes, Ruth, don’t let me near a jigsaw…like a cat playing with a mouse…hours can fly by!
Wow. I don’t know how you do it. You are so talented and kind to share all your knowledge. Thank you, thank you, thank you! Happy birthday!
Some days I don’t know how I do it either…sewing fairies maybe? It was a super birthday this year!
You continue to astound.
Thank you, urbanite, but believe me, I yearn for simple and colorful…none of which seems to be on the horizon!
Wow! I’d like to wish you a belated happy birthday.
Thank you, Anne, it was super and with a surprise at the end!
You are an unbelievable problem solver. I love seeing your process. Thanks for taking the time to document all this.
Thank you, Char, I just wish all of you could visit my sewing room for a close up of these crazy dresses! Taking photos is the next best thing.
Just wanted to say that out of all the posts that show up on my reader, yours are always a can’t miss. I’m always fascinated to see how you “make it work” so that all of the brides get the dress that they want, thanks for the time that you take illustrating your process.
You know, Beth, that I long for a day when a simple dress arrives….there are days that my mind wants to explode with solutions and workarounds to satisfy these girls. Some days I would rather be sitting in your lovely garden drinking iced tea and listening to birds.
You are a miracle worker. Gifted hands! I am in awe.
Mariela, I like your last project of pants where you ditch the waistband and do your own thing http://www.kassminscreations.com/
Wow, I can’t believe some of the complex alterations you do! Some clients have no idea how much work something. I’m with Jay on this one with the whole “a little trouble zipping it” thing. LOL But it did indeed make a good blog post!
Holey Moley…your latest project for the car is amazing!!!! http://wcdesigns.wordpress.com/ Now that is some crazy machine embroidery!
Thank you! It was pretty intense. 😀
Blown away again. I don’t know how you do it! : )
Patience helps and knowing there is a check waiting for me on the last day is a nice incentive…ha ha. Thank you, Shelley!
Admiring your patience and skill!
If you want a challenging career, Kristine, tell people you do wedding alterations…ha ha! Thanks!
I just finished a very similar alteration on a vintage wedding dress that needed only 11″ added into the bodice! The bride was thrilled in the end. 🙂 I love your posts!
Wow Rebekah, your work with brides is amazing too and I like that dress yoiu made for the mother of the bride from a wedding dress…Oh My! Your clients are surely lucky to have you! https://www.rmalterations.com/
You are absolutely amazing.
Well, thank you…most of the time is is fun/rewarding like most jobs and then there are the real stinkers….
Amazing. That bride needed a miracle and you made it happen!
Miracles take a little longer and run up labor costs but well worth it! Every time I unzip the garment bag I have my fingers crossed for “easy”…sadly that is a rare bird!
Another OMG dress! Talk about “a little trouble” getting the zipper up. That zip was never, never even close to going up. Another miracle save. Thanks for sharing all of these impossible fixes with us.
Pingback: Second Hand Rose | fit for a queen
This is a late reply on an old post… I know…
Regarding the once pearl beads that are now very discolored… I washed my mother’s 50’s era gown that was badly yellowed and all the pearls looked like tarnished silver. With just a basic wash with laundry detergent and oxyclean and an extra rinse cycle, it returned to white and all the beads looked like new again.
From my experience, virtually all wedding gowns can be washed (I haven’t had a silk one come my way yet, and I might not attempt that). The first gowns I washed I hand tacked them inside an all cotton bag to protect that lace and beads, but now I just wash them inside out and don’t worry. I have an extra large front loader with a hand wash cycle and I’ve done several gowns originally from the 1950’s to 2016. They come out spectacular. I check that beadwork is sewn and not glued and then in it goes. I shake it out well before it goes into a cool dryer for 20 minutes of air fluffing and then it is usually dry/light enough to hang and finish drying. All that is needed after is a light steaming.
My new daughter-in-law’s gown was a Maggie Sotero heavy poly satin full of hidden hand stitching to hold a million draping folds in place and I have washed it 4 times as it was a dirty sample and then they had 3 wedding events (a civil ceremony, a local reception, and a reception back home). I did have to re-tack a number of folds after each wash, but I couldn’t tell you if it was the wearing or the washing that stressed the stitches. For me it was 20 minutes of quick fixes each time. I guarantee that no dry cleaner would have gotten the grease globbed hem of that dress clean after they ran around the railroad yard getting wedding photos, but with lots of soaking and scrubbing I got it to 97 percent.
If it is poly then wash it don’t dry clean it. The dry cleaning solutions are what yellows over 20+ years.
That is fascinating! I have seen more and more care labels stating how to wash the dresses and hang to dry. My reservation would be with the different woven interfacings and shrinkage. Have you had any puckered zipper tapes? Those glued on pearls can be a problem for prom dresses too and their care labels say, “do not wash or dry clean”…go figure?
My experience is that heat is the enemy when it comes to shrinkage, particularly heat while drying. Most interfacing these days are heat applied so it rather negates the problem and stuff in older gowns was just better made natural fibers that wash okay. I have not encountered any puckering zippers from washing either… at least nothing that a bit a steam didn’t solve. I have encountered some satin interfaced areas that required a touch of steam pressing to look nice again, but never anything major. Everything I have ever washed looked so much better than however it came to me.
A wedding dress I worked on earlier this year was a sample that actually had what I believe was dog hair all in the layers of the gown. The bride and her mom didn’t notice it when they purchased but as soon as I did my inspection before alteration I found it. The last thing I want to do is sew dog hair into the alteration seams – yuck. Thankfully it all came out in a quick wash. I did use fabric softener on that gown to help the dog hair depart.